


How to Setup a Raspberry Pi Samba Server
Setting up Samba on your Raspberry Pi
1. The first thing that we must do before we setup a SMB/CIFS share on our Raspberry Pi is to make sure everything is up to date.
We can update the package list and all our packages by running the following two commands.
|
1 2 3 4 |
sudo apt-get update sudo apt-get upgrade |
2. Now that we have our Raspbian operating system entirely up to date, we can now proceed on to installing the Samba software to our Raspberry Pi.
We can install the packages that we require to setup Samba by running the following command.
|
1 2 3 |
sudo apt-get install samba samba-common-bin |
3. Before we set up our network storage on our Pi, we need to first create a folder that we will share.
This folder can be located anywhere, including on a mounted external hard drive. For this tutorial, we will be creating the directory within the “ pi” users home directory.
Create this folder by running the following command.
|
1 2 3 |
mkdir /home/pi/shared |
Ensure that you don’t use “ sudo” to create any directories you want shared. A directory created using “ sudo” will be owned by the root user.
If you use sudo, you will need to use the chown command to give ownership of that directory to your actual user.
4. Now we can share this folder using the Samba software. To do this, we need to modify the samba config file.
The “ smb.conf” configuration file is where you will store all your settings for your shares.
We can begin modifying the config file by running the command below.
|
1 2 3 |
sudo nano /etc/samba/smb.conf |
5. Within this file, add the following to the bottom. This text defines various details of our share.
|
1 2 3 4 5 6 7 8 |
[crayon-6622c307563bc065610039 class="header add-bottom"][pimylifeupshare] path = /home/pi/shared writeable=Yes create mask=0777 directory mask=0777 public=no |
“[pimylifeupshare]” – This defines the share itself, the text between the brackets is the point at which you will access the share. For example, ours will be at the following address:
|
1 2 3 |
//raspberrypi/pimylifeupshare |
“path” – This option is the path to the directory on your Raspberry Pi that you want to be shared.
“writeable” – When this option is set to “ Yes”, it will allow the folder to be writable.
“create mask” and “directory mask” – This option defines the maximum permissions for both files and folders. Setting this to
|
1 2 3 |
0777 |
allows users to read, write, and execute.
“public” – If this is set to “ no” the Pi will require a valid user to grant access to the shared folders.
6. With the changes made to the file, you can now go ahead and save it by pressing CTRL + X then Y followed by ENTER.
7. Next, we need to set up a user for our Samba share on the Raspberry Pi. Without it, we won’t be able to make a connection to the shared network drive.
In this example, we will be creating a Samba user called “pi” with the password set to “raspberry“.
Run the following command to create the user. You will be prompted afterward to enter the password.
|
1 2 3 |
sudo smbpasswd -a pi |
8. Finally, before we connect to our Raspberry Pi Samba share, we need to restart the samba service so that it loads in our configuration changes.
|
1 2 3 |
sudo systemctl restart smbd |
9. The last thing we should do before we try connecting to our Samba share is to retrieve our Raspberry Pi’s local IP address.
First, make sure you’re connected to a network by either connecting Ethernet cable or setup WiFi.
While you can connect using the Pi’s network name, we will grab the IP address just in case that option fails to work on your home network.
Run the command below to print out the Pi’s local IP Address.
|
1 2 3 |
hostname -I |
In the next couple of sections, we will walk you through the process of connecting to your network attached storage on Windows and Mac OS X.
Connecting to your Samba Server on Windows
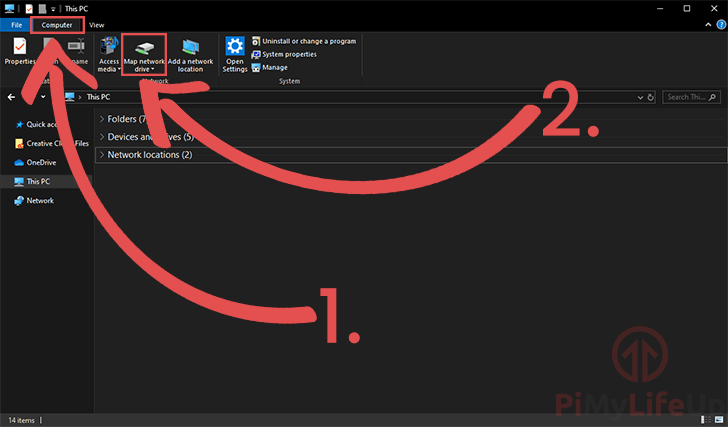
1. To connect to your Samba on Windows, begin by opening up the “File Explorer“.
Within the “File Explorer” click the “Computer” tab (1.) then click “Map network drive” (2.)
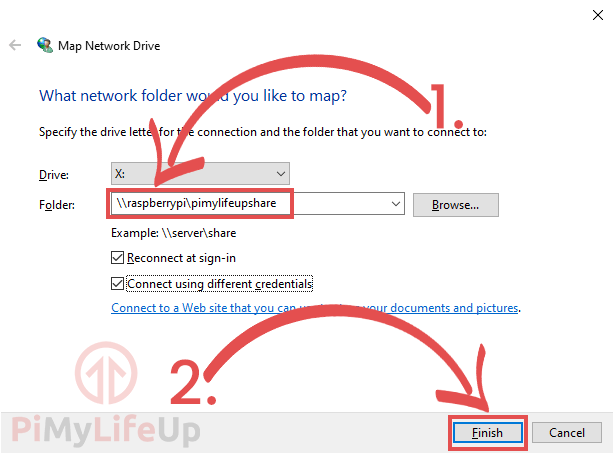
2. You will now be greeted by the dialog shown below asking you to enter some details.
Within the “Folder” textbox (1.) you will want to enter the following “ \\raspberrypi\pimylifeupshare”.
Make sure that you replace “ pimylifeupshare” with the name that you defined for your Samba share.
If for any reason the connection fails, you can switch out “ raspberrypi” with your Raspberry Pi’s local IP address that you retrieved in step 9 of the setting up section of this tutorial.
Once done, click the “Finish” button to finalize the connection.
3. Finally, you will be asked to enter your login details to be able to finish the connection.
Enter the username and password (1.) you set using the “ smbpasswd” tool earlier on in the tutorial.
Once done, click the “OK” button (2.) to continue.

Connecting to your Samba Share on Mac OS X
1. Now to connect to your Raspberry Pi’s Samba server on a MAC OS X system.
You will have to begin by opening the “Finder” application as we have shown in the screenshot below.


2. With the “Finder” application now open, click the “Go” button (1.) in the toolbar, then click the “Connect to Server…” option (2.).
3. Now that the “Connect to server” dialog is now open on your device you can go ahead and enter in the details for your Raspberry Pi’s SMB share.
Within the address box (1.) you will need to enter “ smb://192.168.0.159/pimylifeupshare”.
You will need to swap out the IP address “ 192.168.0.159” with the IP address of your Raspberry Pi that you retrieved in step 9 of the setting up section of this tutorial.
Also, if you changed the name of the share name from “ pimylifeupshare”, you will need to change that section of the address.
Once you have entered the address, you can click the “Connect” button (2.) to begin the connection to your Raspberry Pi’s Samba share.

4. Before the connection is complete, you will be asked to enter both the username and password that you set up using the “smbpasswd” (1.) tool earlier in this guide.
Once you have entered in both of these details, go ahead and click the “Connect” button (2.) to finalize the connection.

By now you should have successfully set up a network drive that you can access on both a Windows PC or a Mac computer. You should also be able to access it on other devices such as mobile phones.
SOURCE: PIMYLIFEUP
[/crayon]