


Raspberry as SeedBox with Deluge

Selecting Your Deluge Configuration Type
We can go about configuring Deluge multiple ways, but not all configurations are suitable for our headless Pi download box. The most common way people use a torrent client is as a desktop client. This doesn’t work very well for our purposes, because it means every time you wanted to interact with your torrents you would have to login to the box via remote desktop and mess around with the desktop client. It wastes your time and it wastes resources on the Pi.
The second method involves running the Deluge WebUI, which allows you to access the Deluge client via any modern web browser on your network (or granted access through your firewall to your network). This is significantly more convenient than having to remote desktop into the system, but it’s still not as powerful as the last option. One area where the WebUI does shine, however, is opening up the potential of using a smartphone app to view and control Deluge (more on this later).
The last option, and our preferred method, is to configure Deluge on the remote machine to accept ThinClient connections. In this manner, we can use the actual Deluge desktop client on our desktop machine (be it a Windows, Linux, or OS X box) and connect it into the remote Raspberry Pi Deluge installation; you get all the benefits of the desktop client on your actual desktop while the actual downloading happens on the remote box.
With all that in mind, we’re going to show you how to configure a ThinClient setup and then a WebUI setup. If you’re only going to be connecting around the house we strongly suggest going the ThinClient route. If you want to set up your installation so that it is easy to peek in with your iPad or Android phone, add in the WebUI component.
Before we do anything, however, let’s take a moment to update and upgrade our repositories:
|
1 2 3 4 5 |
sudo apt-get update sudo apt-get upgrade |
Once we’re upgraded, it’s on to the client access configuration portions of the BitTorrent tutorial.
Setting up Deluge for ThinClient Access
Now it’s time to begin installing the necessary components for the ThinClient setup. Enter the following commands:
|
1 2 3 4 5 |
sudo apt-get install deluged sudo apt-get install deluge-console |
This will download the Deluge daemon and console installation packages and run them. When prompted to continue, type Y. After Deluge has finished installing, we need to run the Deluge daemon. Enter the following commands:
|
1 2 3 4 5 |
deluged sudo pkill deluged |
This starts the Deluge daemon (which creates a configuration file) and then shuts down the daemon. We’re going to edit that configuration file and then start it back up. Type in the following commands to first make a backup of the original configuration file and then open it for editing:
|
1 2 3 4 5 |
cp ~/.config/deluge/auth ~/.config/deluge/auth.old nano ~/.config/deluge/auth |
Once inside nano, you’ll need to add a line to the bottom of the configuration file with the following convention:
|
1 2 3 |
user:password:level |
Where in user is the username you want for Deluge, password is the password you want, and the level is 10 (the full-access/administrative level for the daemon). For our purposes, we used pi:raspberry:10.When you’re done editing, hit CTRL+X and save your changes. Once you’ve saved them, start up the daemon again and then the console:
|
1 2 3 4 5 |
deluged deluge-console |
If starting the console gives you an error code instead of nice cleanly formatted console interface type “exit” and then make sure you’ve started up the daemon.
Once you’re inside the console, we need to make a quick configuration change. Enter the following:
|
1 2 3 4 5 6 7 |
config -s allow_remote True config allow_remote exit |
This enables remote connections to your Deluge daemon and double checks that the config variable has been set. Now it’s time to kill the daemon and restart it one more time so that the config changes take effect:
|
1 2 3 4 5 |
sudo pkill deluged deluged |
At this point your deluge daemon is ready for remote access. We need to install the Deluge desktop client in order to finish the configuration. Hit up the Deluge Downloads page and select the installer for your operating system. Once you have installed the Deluge desktop client, run it for the first time; we need to make some quick changes.
Once launched, navigate to Preferences -> Interface. Within the interface submenu, you’ll see a check box for “Classic Mode”. By default it is checked. Uncheck it.
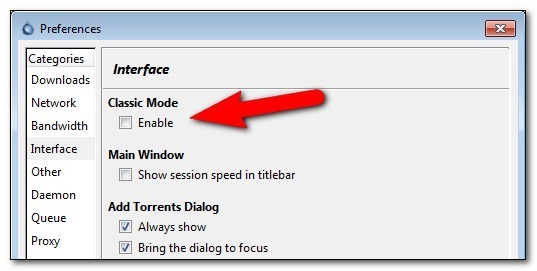
Click OK and then restart the Deluge desktop client. This time when Deluge starts, it will present you with the Connection Manager. Here is where you input the information about your Raspberry Pi and the Deluge installation. Click the Add button in the Connection Manger and plug in your Pi’s info like so:
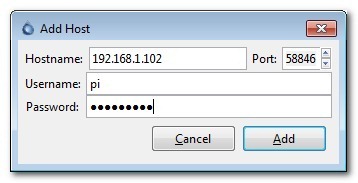
You’ll need to input the IP address of the Raspberry Pi on your network, as well as the username and password you set during the earlier configuration. Leave the port at the default 58846. Click Add.
Back in the Connection Manager, you’ll see the entry for the Raspberry Pi; if all goes well, the indicator light will turn green like so:
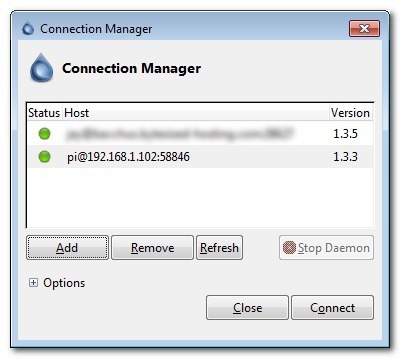
Click Connect and you’ll be kicked into the interface, connected to the remote machine. It’s a fresh install, nary a .torrent in site, but our connection between the remote machine and the desktop client is a success!
Setting up Deluge for WebUI Access
Configuring the WebUI is significantly faster but, as we mentioned before, you’ll have access to less features than with the full ThinClient experience. One of the most useful features you gain from using the ThinClient, associating .torrent files with the Deluge ThinClient for automatic transfer to the remote Deluge daemon, is missing from the WebUI experience.
To install the WebUI, go to the terminal on your Pi and enter the following commands. Note: If you already installed the Deluge daemon in the ThinClient section of the tutorial, skip the first command here.
|
1 2 3 4 5 6 7 |
sudo apt-get install python-mako sudo apt-get install deluge-web deluge-web |
This sequence installs the Deluge daemon (if you didn’t already install it in the last section), Mako (a template gallery for Python that the WebUI needs), the WebUI itself, and then starts the WebUI program.
Terminal may hang up when you enter deluge-web. Just close the connection, open another and continue.
The default port for the WebUI is 8112; if you wish to change it use the following commands:
|
1 2 3 4 5 |
sudo pkill deluge-web nano ~/.config/deluge/web.conf |
This stops the WebUI and opens up the configuration file for it. Use nano to edit the line: “port”: 8112, and replace the 8112 with any port number (above 1000, as 1-1000 are reserved by the system).
Once you have the WebUI up and running, it’s time to connect into it using a web browser. You can use a browser on the Pi if you ever need to, but it’s not the most pleasant user experience and best left for emergencies. Open up a browser on your regular desktop machine and point it at the IP address of your Pi (e.g. http://192.168.1.102:8112).
You’ll be greeted with a password prompt (the default password is “deluge) and be immediately encouraged to change it after you enter it for the first time. After that, you’ll be able to interact with Deluge via the lightweight interface.
Configuring Your Download Location
Our next step is to configure Deluge to use our external hard drive. By following along with the hard drive mounting instructions in How to Turn a Raspberry Pi into a Low-Power Network Storage Device, you’re ready with a hard drive set to auto-mount on boot.
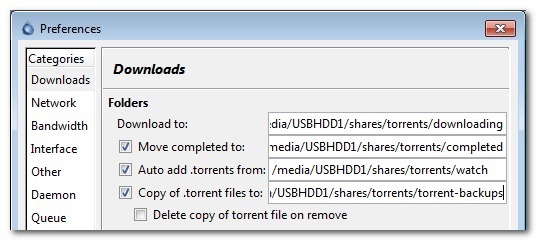
Now all we need to do is change the default locations in Deluge. Navigate to Preferences -> Downloads. By default Deluge directs everything to /home/pi. That little SD card is going to fill up real fast, however, so we need to change it.
First, we’re going to create some new folders in /media/USBHDD1/shares, which is the share folder we already set up in the Low-Power Network Storage Device tutorial. This way we can easily access our downloaded torrents over the network and have a network accessible watch folder for auto-loading torrent files. Use the following commands to create the folder set (adjusting the pathnames accordingly for your location if you’re not using the same Pi setup from the previous tutorial like we are):
|
1 2 3 4 5 6 |
sudo mkdir /media/USBHDD1/shares/torrents/downloading sudo mkdir /media/USBHDD1/shares/torrents/completed sudo mkdir /media/USBHDD1/shares/torrents/watch sudo mkdir /media/USBHDD1/shares/torrents/torrent-backups |
Now we’re going to turn right around and plug these four new directories into Deluge:
Configuring Deluge to Run on Startup
Before we leave the Deluge setup there is one final detail to attend to. We need to set up the Deluge daemon and WebUI to run automatically when our Raspberry Pi boots up. The configuration scripts the Deluge developers provide for Ubuntu work just fine for Raspbian, so rather than re-invent the wheel, we’re going to use their scripts. To save you the effort of cutting and pasting huge blocks of text, we’ve hosted the scripts on the How-To Geek servers so you can use the wget command to download them. From the terminal, enter the following commands:
|
1 2 3 4 5 |
sudo wget -O /etc/default/deluge-daemon http://www.howtogeek.com/geekers/up/sshot5151a8c86fb85.txt sudo nano /etc/default/deluge-daemon |
This copies the script, renames it and places it in the appropriate directory, and opens it in the nano editor. The first script is the only one we will need to edit. Within nano, edit the third line of the script to include the username you set up in earlier part of the tutorial (as you’ll recall we set the Deluge user to “pi” so we’ll insert that here like so):
|
1 2 3 |
DELUGED_USER="pi" # !!!CHANGE THIS!!!! |
If you don’t put a the username you selected for the Deluge daemon in there, the script won’t run. After you’ve finished editing, press CTRL+X and save your changes. When you’re back at the terminal, enter the following commands to make the script executable and update the startup file to include it:
|
1 2 3 |
sudo chmod 755 /etc/default/deluge-daemon |
Now we need to add the actual init.d script to Raspbian. Again, at the terminal, enter the following commands:
|
1 2 3 4 5 6 |
sudo wget -O /etc/init.d/deluge-daemon http://www.howtogeek.com/geekers/up/sshot5151aa042ad11.txt sudo chmod 755 /etc/init.d/deluge-daemon sudo update-rc.d deluge-daemon defaults |
We were able to download, place, and modify the file all in one sweep here, as the init.d script requires no user editing.
At this point, we would recommend restarting Raspbian, so fire off a “sudo reboot” at the command line. Once the Pi has finished rebooting, attempt to connect into the Deluge daemon using the ThinClient and the WebUI. There are two major errors here we’re looking for.
First, a failure to connect at all means that the initialization scripts didn’t work. Open up the terminal/SSH client and manually start the daemon and WebUI using the commands we learned earlier in the tutorial. Check to see that it works now and then review the initialization script instructions.
Second, if you can open up the client, but it shows permission errors for your existing torrents (like the Linux torrent we used to test things in the previous portion of the guide), that indicates that your external USB HDD was not mounted or mounted incorrectly. Review the sections on installing a USB HDD and setting it to auto-mount on boot in the How to Turn a Raspberry Pi into a Low-Power Network Storage Device tutorial.
Enhancing Your Torrenting Experience
Now that you have your torrent box configured and ready to rock, there are a few additional tools and modifications you can look into to really enhance your user experience. None of these tips and tricks are necessary, but they do make your Raspberry Pi turned Torrent Box easier to use.
Add Mobile Access: Consider downloading a mobile control app like Transdroid for Android phones. Unfortunately we don’t have any solid suggestions for iOS users as Apple has taken a really aggressive stance towards torrent-related apps in the App Store (and has banned any apps that slipped through the submission process).
Deluge doesn’t currently have a mobile-optimized template for the WebUI, but it’s more than functional on tablets like the iPad and Kindle Fire.
Set Up a Shared Drop Folder: Although we mentioned it briefly earlier in the tutorial, ensure that the /torrents/watch/ folder you created is accessible on your network. It’s really convenient to be able to dump a pile of .torrent files into the folder and have Deluge load them up automatically.
Install Browser Plugins: There are several Deluge-centered plugins for Chrome and Firefox that improve the user experience, including:
Chrome:
- DelugeSiphon – Enables .torrent adding from the WebUI
- Deluge in Chrome – Simple view of current torrents and their progress
Firefox:
- BitTorrent WebUI+ – Enables .torrent adding from the WebUI
- WebUI Quick Add Torrent – Greasemonkey Script that adds clickable icon on webpages for easy torrent adding
Activate Deluge Plugins: There are a host of great plugins already included in Deluge and even more third-party plugins. Some of the included plugins you may want to take advantage of include:
- Notification: You receive email alerts from Deluge on torrent completion and other events
- Scheduler: Limit bandwidth based on time of day
You can find these in Preferences -> Plugins. Check the ones you want and a new entry will appear in the preferences menu (e.g. Preferences -> Notifications).
For more information about third party plugins and how to install them, check out the Plugins page in the Deluge Wiki.